Wednesday, August 17, 2016

Configuring and working with NetTopo Simulator in Eclipse Kepler


Prerequisites:

The system should have either Java 6.0 or higher (i.e., both the JDK and JRE need to be installed), and the JAVA_HOME path should be set in the System variables.  

Configuration Procedure

Step 1:  Download and extract the Eclipse Kepler for JAVA by clicking here.
Step 2: Download Java3D and install in the Java installation directory by clicking here
Step 3:  Extract the Eclipse to C: Drive and run the Eclipse IDE.
Step 4:  Create CVS Project
               4.1 File -> New -> Project -> Project from CVS


               4.2  Set Host -> nettopo.cvs.sourceforge.net
                             Repository Path -> /cvsroot/nettopo/
                             User -> anonymous 
                             Password -> No password required (empty)
                             Connection type -> pserver
                             Port -> Use default port

                             click Next


                   4.3  Project name -> NetTopo

 Step 5: Setting up Ant build and run
               
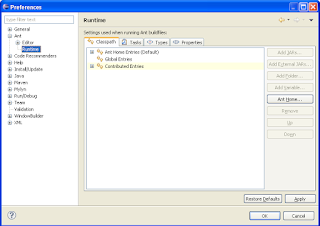
               5.1  In Window menu, select Preferences -> Ant -> Runtime


                   5.2  Select Ant Home Entries and Click on Add External Jar Files
                    
                   select

                  C:\Program Files\Java\jdk1.6.0\lib\tools.jar
                  C:\Program Files\Java\Java3D\1.5.2\lib\ext\j3dutils.jar
                  C:\Program Files\Java\Java3D\1.5.2\lib\ext\j3dcore.jar
                  C:\Program Files\Java\Java3D\1.5.2\lib\ext\vecmath.jar

                 and save the Entries.

Building and Running the NetTopo Project

Step 6:  In Run menu select Run Configurations 
               Project: NetTopo
               Main class: org.deri.nettopo.app.NetTopoApp


Step 7: In (X) argument tab enter the following under VM arguments

                -Djava.library.path=bin


Step 8: In the Package Explorer select NetTopo project and right click
              Run As -> Java Application -> NetTopo Application


Friday, April 22, 2016

Jaypee Institute of Information Technology (JIIT), Noida, PhD Thesis LaTex Template

This post consists of the Ph.D Thesis template of Jaypee Institute of Information Technology, Noida, India. The details of the files and folders are as follows
This template is created using LyX platform.
It consists of three main folders namely
1.       front_matter: It consists of the files related to the contents that are placed before the chapters.
They are
cover_page.lyx – Cover page of the thesis
dedication.lyx – Dedication page of the thesis
acknowledgements.lyx – Acknowledgements page of the thesis
declaration by student.lyx – Scholar declaration
supervisor certificate.lyx – Supervisor certificate
abstract.lyx – Abstract of the thesis

2.       main_matter: It consists of chapters of the thesis. Separate folder is created for each chapter. Each chapter folder consists of Image folder in which figures of that chapters are stored.

3.       end_matter: It consists of the files related to the contents that are placed after chapters.
They are
annexure.lyx – annexure or appendix of the thesis
references.lyx – Bibliography of the thesis – references are placed in bibtex format in the references.bib file. It follows IEEE referencing format.
publications.lyx – list of publications out of the thesis
biography.lyx – Authors biography
end_page.lyx - Copyright information of the thesis

The full thesis can be seen by running thesis_main.lyx file.
For writing algorithms, Algorithm2e.pdf file is placed for reference.
For reference, you may view JIIT PhD thesis preparation guidelines in jiit_phd_thesis_guidelines.pdf file.


   Click Here to download the JIIT PhD thesis template  (Last updated 06-05-2016)


Sunday, February 21, 2016

Handling Segmentation Fault (Core Dumped) in ns-2

Programming c++ in ns-2 is a nightmare for beginners. It requires systematic planning and programming. Though the programming is systematically planned, even experienced programmers frequently encounter  bugs called "Segmentation fault (Core Dumped)" and Floating point exception (Core Dumped).  Generally, Floating point exception can be dealt with positive value in the denominator of an expression. This post explains how to debug these problem in ns2. The following procedure has been tested with ns-2.35.

Prerequisite: Your system should installed with gdb (GNU debugger).

Step 1: goto ns-allinone-2.35/ns-2.35, and edit the Makefile.in file

replace from
CCOPT    = @V_CCOPT@ 

to

CCOPT    = @V_CCOPT@ -g

Next, replace the following from

DEFINE    = -DTCP_DELAY_BIND_ALL -DNO_TK @V_DEFINE@ @V_DEFINES@ @DEFS@ -DNS_DIFFUSION -DSMAC_NO_SYNC -DCPP_NAMESPACE=@CPP_NAMESPACE@ -DUSE_SINGLE_ADDRESS_SPACE -Drng_test

to

DEFINE    = -DTCP_DELAY_BIND_ALL -DNO_TK @V_DEFINE@ @V_DEFINES@ @DEFS@ -DNS_DIFFUSION -DSMAC_NO_SYNC -DCPP_NAMESPACE=@CPP_NAMESPACE@ -DUSE_SINGLE_ADDRESS_SPACE -Drng_test -DNDEBUG -DDEBUG 

Step 2: Save the file and do the following

$ ./configure

$ make clean

$ make distclean

$ ./configure

$ make

$ sudo make install

Now debugging to your ns-2 is ready. If you have encountered the Segmentation fault bug while running any tcl file, then do the following

Step 3: goto the tcl folder and do the following

$ gdb ns

(gdb) run your_tcl_filename.tcl

TCL file runs with the above command and it stops at bug point showing the statement where the bug has present.